
Guest Post: Two-for-One Screen Prints
Hi, my name is Eric and I’m invisible for a day. The kind folks at Invisible Man are letting me guest post so I’m doubling up for my big break.
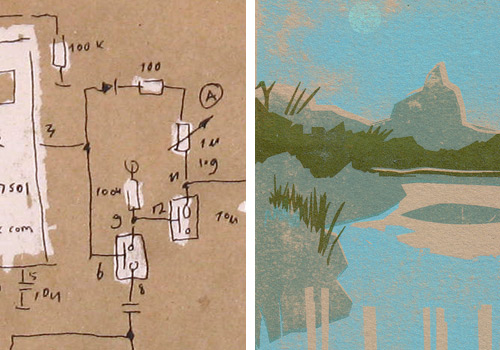
The left image is a detail of a silk screen promotional poster for TOOL: An evening of novel performance technologies, which took place at Tonic in NYC on Saturday April 29th, 2006. I did this for a friend, Jamie Allen who teaches NIME: New Interfaces in Musical Expression at NYU and coordinates the show. He asked for a “sort of an american-inventor-folk-art-technology thing”. He got sound schematics and ear diagrams on craft paper… If you have any interest in experimental music and video, check it out.
And the right image is a detail of the save-the-date from my wedding. It is a screen print of the landscape of our wedding venue, The Hammond Museum, done with a Print Gocco printing kit.
Read on for the full images, info and tips.
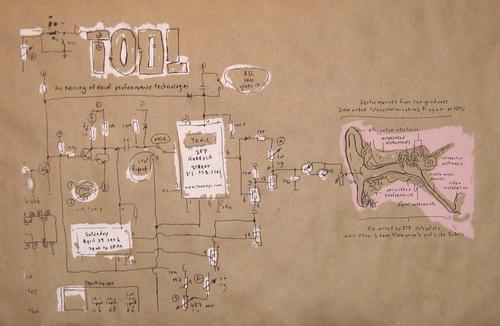
Click above for the full image.
I get all my silk screen supplies from Standard Screen Supply. When I have an image too big to shoot myself, they’ll usually turn it around in a day. They’ll also cut specific squeegee sizes to the inch for $1.25 an inch. And, even if you’re going to shoot your own screens, they’ll print perfect large size transparencies. Last time I was there it was about $20 for approx. 15×24 transparency.
If you’re screen printing at home, and you can’t get enough water pressure to clear your screens. Get an adaptor (most hardware stores will cary them, but make sure you have the right kind) to connect a garden hose and spray nozzle to a regular faucet. That should do the trick.
If you have a larger screen and can’t fit it in your tub or sink, you can get a photo developing tray. It’s just a big plastic tray with a corner that allows for pouring. It can be awkward but they are way cheaper than installing a slop sink.
Always have plenty of paper cups, jars and popsicle sticks. You can use the cups to mix and pour your ink, the sticks to stir and help pour and the jars are to store your colors. Having a cup with a straight edge helps because you can easily wipe off excess ink from the sticks into the cup. Trying to mix in a jar with and then scrape off the ink on a threaded neck is next to impossible and if all your ink isn’t mixed properly you can get some “marble” effect in your printing.
For the printing itself, I just have a cheap wooden door that I got from Home Depot on two saw horses. Because it isn’t precious, I don’t worry if I have to move around my hinges to get a good angle for printing larger or smaller pieces. I just sand off old holes to keep from getting splinters. Another tip from personal experience.

Click above for the full image.
I would only use the Gocco for printing one or two color things that don’t really need to register. My wife and I, of course, printed four colors that had to be registered. NEVER again, registration by touch, actually feeling when the paper is aligned, is probably the stupidest thing I’ve ever tried to do.
Thanks for letting me guest post. Hopefully I’ll be able to do it again soon.